The Space We Need: Thoughts on Van Camping
- Nola Marley

- Jun 16, 2021
- 6 min read
As many people my age have probably said at one point or another, I kind of like the idea of living in a van. A symbol of the hippie movement of the 60s and 70s, van life has reemerged into the mainstream as a preferable alternative to the more traditional ways of dwelling. Many consider van living as a more sustainable, slow pace lifestyle that values being closer to nature and minimizing consumption; things that drew me to it as well.
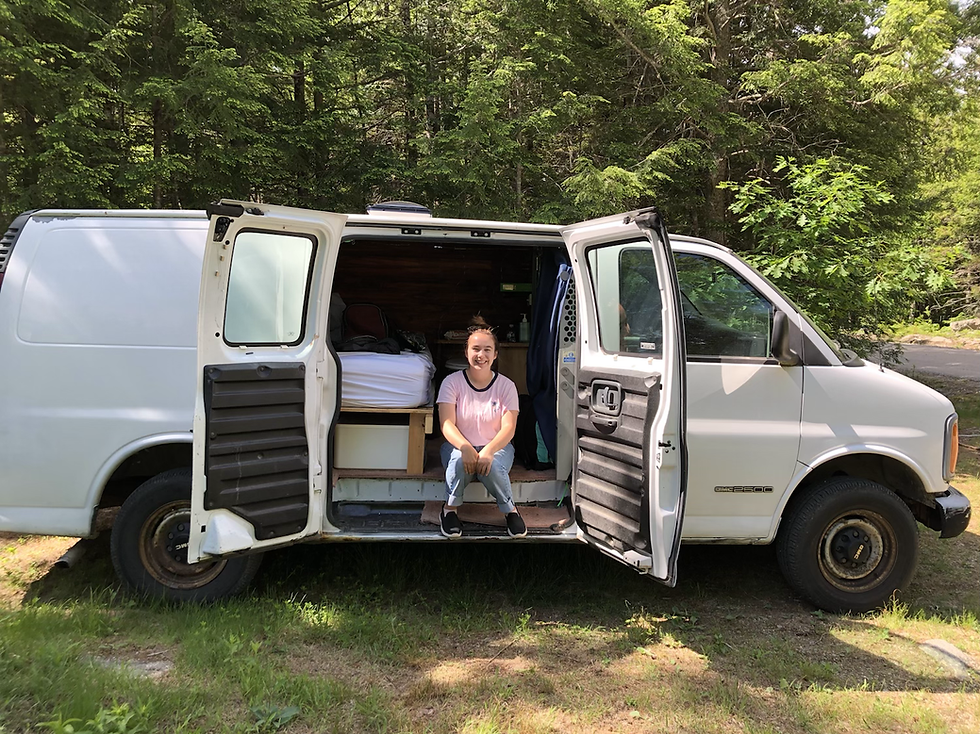
I got my first taste of van living this past week when Jasper and I took a homemade camper van out into the woods. Jasper’s parents renovated an old white 1997 GMC Savana into a camper van. Now, I’ll make clear that this van wasn’t made for long term living: it primarily consisted of a queen size bed, some storage space, and a bucket with a toilet seat drilled on. There was a ceiling vent installed which made a huge difference for us on our first night, when temperatures were in the 90s all day. While we only had about 3 square feet of floor space, which was home to our backpacks and shoes, it was quite a cozy little setup.
We spent two nights in the van. The first we went the more “traditional” route (e.g. traditional by camping standards anyway) and stayed at a campground. Lamoine State Park offered us a beautiful ocean view parking spot with a picnic table and fire pit. Arguably the best part was the flush toilets and hot showers, a rarity even in the pricier campgrounds. Jasper and I both love the idea of working at a state park, and this trip gave us major daydream fuel. As we walked around the park, we saw staff RVs and camper trailers that gave me half a mind to ask for an application then and there. Imagine camping full-time and getting paid for it!
But anyway, one of the first things about the van that we were preoccupied with was maintaining the temperature and keeping the bugs away. Since the AC didn’t work, we primarily relied on the windows while we drove and the vent when we were parked. I’m sure nicer vans might have a better system, but for a starter set-up this worked fine. We found that having the vent on the exhaust setting (letting out air from the van) worked well when it was hotter outside than inside the van. On the flip side, having it on the intake setting worked best when it was cooler outside than inside, drawing in the cool air and forcing out the hot air.
I would say having a vent was a must to keep us remotely comfortable. Even if the AC did work, we wouldn’t have been able to keep it running all night, so being able to ventilate without letting in all the bugs was very important.
Bugs are just a fact of life when you’re van camping (and really any kind of camping). Although we did our best to keep the doors and windows closed whenever we could, those little things are persistent.
As a potential life hack though, we found that directing our flashlights away from the van helped distract the bugs from the lights inside the van at night when we were packing up. (I suppose you could also spray everything with repellent if you don’t care about your paint job.)
Another thing that we had to work out was where exactly we were going to park it. Since it’s not completely just a van and not entirely a camping vehicle, we experienced some issues when we were looking for free sites. Most campgrounds see camper vans as RVs and will allow you to use their space (though I recommend double checking with them first). But if you’re interested in boon docking or camping for free, here are some resources and things to think about:
BLM (Bureau of Land Management) land generally allows camping free of charge. For example, since we’re based in Maine, we went to Schoodic Beach on Donnell Pond in Sullivan, which has designated camping areas which allow people to camp there for up to 14 constituent days with no cost. (The sites themselves were NOT accessible by van, so we parked instead in an inlet along the road.) Sites like these are public land and therefore cannot charge a fee, as long as you follow their fire and safety guidelines. And many are accessible by van.
National and State Forest Land: Many of these places already have campgrounds set up, and some will charge a nightly fee, though it’s usually not too expensive. However, these can seriously save you some money if you’re looking to park somewhere long term.
https://freecampsites.net/ We’ve found this website useful sometimes when we’ve needed to find somewhere nearby. It shows you a map of your area and what campsites are available near you, and whether they’re free, accessible by car/van, and what types of amenities they might have.
Make sure you always follow the Leave No Trace Policy. We want the environment to be safe and available for everyone, so your effort to keep the land clean is appreciated not just by the land management, but also by everyone else who hopes to enjoy it for years to come.
If you’re considering building your own van, or upgrading a camper van you already have, here are 5 things we noticed that you may want to think about:
Use the bed space efficiently: If you have the opportunity, I’d recommend raising the bed off the floor, so you can have extra storage space underneath. Since it’s probably the biggest item that has to go in any van, it’s important to use it wisely. We found that we valued the storage under the bed a lot more than we valued the head space. Trust me, when you’re trying to fit your firewood, cooler, cooking utensils, and clothes all in that van, any extra room is a blessing.
DIY Composting Toilet: Although there are some pretty fancy composting toilets on the market today, if you’re in a pinch or looking to save some extra money, try using kitty litter! Fill the bottom third of a bucket with some kitty litter and stick a toilet seat cover on top, and you’re golden! Might be a little redneck, but you come to appreciate it when you wake up at 2am in the middle of the woods
Magnets are your friends: we used magnets for EVERYTHING. We clipped the privacy curtains to the door frame so the windows were completely covered. We used magnetized flashlights to stick to the wall or the ceiling when we needed to be hands free. Take advantage of the fact that most vans have mostly (if not entirely) metal interiors and exteriors. A pack of good, strong magnets will take you far!
Spare car battery for electronics and lights: some vans will use the same battery for running the car and charging their phone, but that just isn’t going to last long term, and you run the risk of getting stranded in the middle of nowhere. So use a spare car battery for all your other electronics, and leave the original battery alone. They’re rechargeable and aren’t too expensive or hard to find (though if you have the opportunity to go solar, go for it). Our battery powered the vent for two nights, and would likely have lasted us another couple days. We used a small solar battery bank to charge our phones and our mini fans (another great option!)
Secure everything in containers or bags: we had plenty of things roll off the bed or the counter and onto the floor while driving. Fortunately most of the things we had were pretty durable so nothing broke. If you’re not planning on going on a lot of bumpy roads, you’re probably fine. But if you don’t have a lot of fragile things with you, don’t feel like you have to batten down the hatches every time you drive. If you pack it right, most things will be able to take a hit. Another reason why storing things under the bed is a good idea.
Since we plan on van camping for our first week in Hawaii, we thought this would be a good opportunity to get acquainted with that lifestyle. The van we booked on Airbnb will be more professionally built, and likely include more gadgets and conveniences than this homemade van, so I’ll be writing more about that in a couple weeks.
Days until flight: 8
Cheers,
Nola


Comments